TL;DR
Stan Store Email Flows are automated email sequences that send when a customer takes an action, so you stay in front of your audience without lifting a finger. To build one, tag your customers by segment, open the Email Flows tab, name your flow, and choose a trigger: after a purchase, on a specific date, or after cart abandonment. Then stack 4-5 emails with staggered timing, test send them to yourself, hit Publish—and bam! Your Flow is live.
Your email list is growing. That’s a real win. But if the only thing you’re sending those subscribers is a single thank-you email after they buy, that list is doing a tiny fraction of what it could be.
A name and an email address sitting in your account won’t make your online business any money. The follow-up will. And if you only ever send a single thank-you email after someone buys your offer, you’re leaving a whole lot of relationships—and revenue—on the table.
That’s where Email Flows come in. They help you nurture the relationship from just subscribed to their first sale.
By the end of this lesson, you’ll know exactly what Email Flows are, how to segment your audience with tags, and how to build automated sequences that nurture your customers.
New here? I’m Professor T—the guy who helps Creator-Entrepreneurs squeeze every bit of value out of Stan Store, the all-in-one link in bio store for selling digital products, courses, communities, and coaching sessions without duct-taping five tools together. Creators have already made over $600M+ in sales on Stan, and I’m here to help you become one of them.
In this lesson, we’ll cover:
💜 What Email Flows are and how they nurture your audience on autopilot
💜 How to tag and segment your customers so the right people get the right emails
💜 How to build a sequence around each of the three triggers—after purchase, specific date, and cart abandonment
💜 How to send one-off broadcasts and track how every email performs
Prefer to watch and follow along? Check out the full lesson right here or get access to more tutorials inside Stan’s Success tab.
Heads Up! Email Flows are only available on the Creator Pro plan. If you’re already on a Creator Pro membership, let’s build. If you’re on the basic Creator plan, stick around anyway for a solid look at what you’d unlock, so you can decide whether the upgrade is worth it for you.
What’s an Email Flow?
An Email Flow is a sequence of automated emails that gets sent to your customers when they take a specific action. Say someone downloads your lead magnet, buys a guide, books a coaching call, or signs up through your referral link. Once you’ve set up the trigger, the whole email sequence will hit subscribers’ inboxes on its own at whatever cadence you’ve set up.
That’s the beauty of it. You put in the work upfront, and then your follow-up runs on autopilot while you focus on everything else.
Here’s why this matters so much. Studies show it takes around seven touchpoints before someone’s ready to buy from you. One email isn’t enough—you need a thoughtful sequence of four or five emails to nurture someone toward a sale. And Email Flows are how you can deliver that without manually hitting send every single time.
How to Use Stan Email Flows
Step 1: Tag Your Customers Into Segments
Before we build a single email, let’s talk about tags—they’re what help you send the right emails to the right people. Think of tags as your audience segments. Once they’re set, you can point any Flow at exactly the group you want—and easily manage your list.
To view and edit your tags, head to your Customers tab. You’ll see a list of everyone who’s bought from you, sorted by name, email, how long they’ve been a customer, how many purchases they’ve made, and how much they’ve spent with you over their lifetime.

Up top, you’ll see a row of purple buttons. Look for +Tag, click it, and you’ll be able to view any existing tags you already have for your account.
If you’ve imported customers from outside Stan, you’ll see tags marked with the date and time of that import. If you’ve made sales, you’ll see tags for the customers who bought specific products. And if your account is brand new with no tags yet, don’t sweat it—that’s normal. You’ll build them as you go.
Step 2: Open the Email Flow Builder
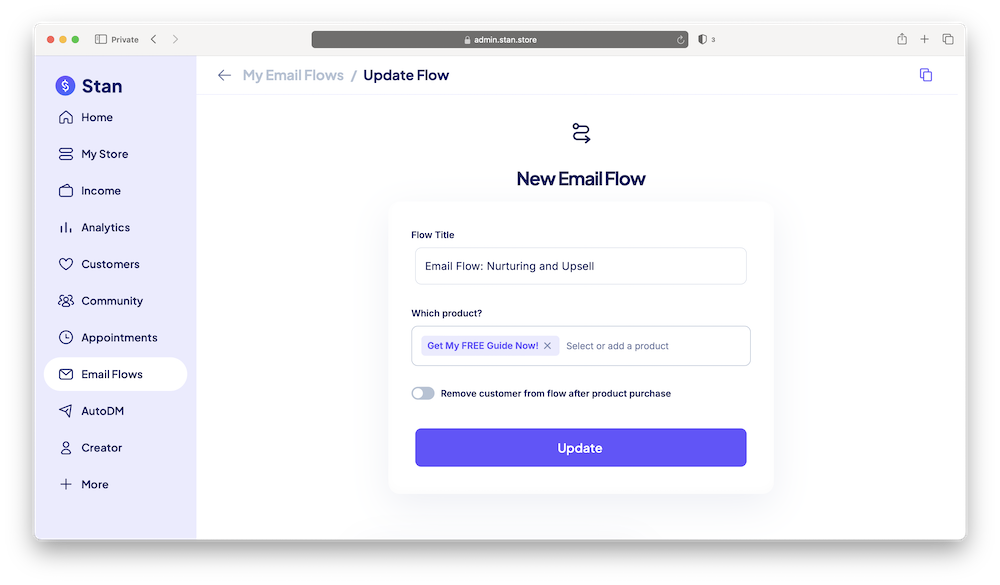
There are two ways you can access Stan’s email builder: from a product within your Stan Store or from the main menu.
To navigate to it from a product:
- Go to your My Store tab and click into the product you want to attach an Email Flow to.
- Open the Options section and scroll down to the Email Flows section (second from the top).
- Press Add Flow, then Create Email Flow, and you’ll land in the builder.
To navigate from the main menu:
- Scroll to +More on the left-hand side of your dashboard and click Email Flows (third option from the top).
- Toggle it on to keep it pinned to your sidebar, or just click into it and select Add Flow to start.
Now, let’s build our first one.
Step 3: Name Your Flow and Choose a Trigger
First, name your Flow. Your customers will never see this—it’s purely for you to keep things organized, so customize it with something clear like Welcome Flow. Then, press Next.
Now for the important part: choosing your trigger. This is the action that sets the whole sequence into motion. You’ve got three trigger options:
- After a product purchase—the sequence fires once someone buys. Perfect for a welcome or nurture flow.
- On a specific date—the sequence goes out at a date and time you set, to an audience segment you choose. Great for launches and announcements.
- After cart abandonment—the sequence sends when someone hits your checkout page but bounces without buying. Your automatic second chance.
Pick the one that matches your goal and press Next.
Step 4: Build Your Email Sequence
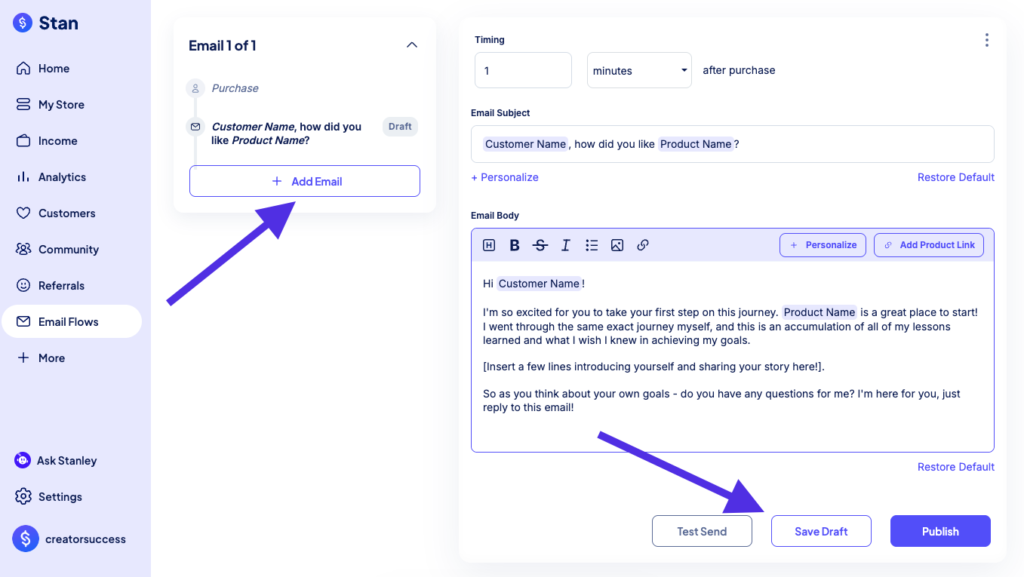
Now, it’s time to build out the emails themselves. Here’s how.
Set the Timing
The first thing you’ll edit is when the email sends. It defaults to 1 hour after the trigger, but you can change both the number and the unit—minutes, hours, or days.
In this example, we’re setting up a welcome flow (which is meant to nurture new subscribers), so I’ll set this first email to go out 2 hours after a purchase.
Keep in mind: Every buyer already gets a confirmation email the moment they purchase, so this first Flow email is really the second message they’ll get from you.

Write Your Subject and Body
Next, write your email subject and body. Make the subject as enticing as possible—that’s what earns the open. Then, fill the body with something worth reading, whether that’s a warm welcome, a quick tip, or a nudge toward your next offer.
You can also add an Add Product link right into the email body, so when someone clicks it, they’re taken straight to that product’s checkout page. It’s a clean way to upsell subscribers on an adjacent product when you feel like the timing’s right in your sequence.
Test Send It to Yourself
Before anything goes live, do your due diligence and preview the sequence from your customer’s point of view. Hit Test Send, type in your own email address, and press Send Test.
Head over to your inbox and check it out. You should see your subject line, copy, and any personalization tags filled in with real info—like your customer’s name.
Once everything looks good, you’re ready to keep building.
🚨 Heads Up! The product name tag will only appear as filled if you’ve made a real purchase, so don’t panic if it’s blank on a test send.
Stack Multiple Emails
One email isn’t a Flow—it’s just an email. To build the real thing, press Save Draft, head back to the top-left panel, press +Add Email, and start on the next one.
Here’s where you should space things out. My first email went out at 2 hours, so I’ll set the second for 2 days later, the third for 7 days, and a fourth for 10 days, and so on.
You’ll want to edit each email’s subject line and body, save as you go, and keep stacking emails until your sequence is complete.
Need to cut one? Hit the three dots in the top-right corner and press Delete.
Pro Tip: Aim for at least 4–5 emails in every Email Flow. That’s enough room to build trust, deliver real value, and pitch your offer—without bombarding subscribers. Space them out so you maintain momentum while giving people a little breathing room in between sends.
Step 5: Set Up the Date and Cart Abandonment Triggers
The after-purchase build is your template. The other two triggers work almost exactly the same way.
On a Specific Date
When you pick this trigger, you’ll need to set the exact date, time, and time zone for the sequence to send first. Then you’ll choose who should receive it: press Add Audience, select your tags, and Stan automatically pulls in that segment.
This is where the tagging from Step 1 really pays off. You can target one group, stack several, or send to everyone. You can also exclude users so a segment doesn’t receive a duplicate sequence if the same Email Flow is attached elsewhere. From there, you can build your emails exactly the same way we did before.

After Cart Abandonment
This trigger fires when someone lands on a checkout page and leaves without buying. You can choose whether it applies to every product or just one, then build your sequence.
There’s just one catch: your delay timer is measured in days only (not minutes or hours) because Stan’s abandoned-cart data resets every 24 hours. So you can set up your abandoned cart marketing email to send 1, 2, or 3 days after someone views your offer—or whatever makes sense for your audience.
Step 6: Publish and Track Performance
Once your emails are written and timed the way you want, it’s go time. Press Publish on each email in the sequence to fully activate your Flow.
Back in your Email Flows tab, every Flow is labeled with an icon so you can easily tell them apart at a glance:
- A dollar sign ($) for after-purchase
- A calendar and clock icon for scheduled sends
- And a cart with an X for abandoned carts
To track how your emails are performing, click the analytics icon next to any Email Flow. It’ll open the analytics view, where you can see delivered emails, opens, clicks, click-through rate, and bounces across any date range you choose.
Send One-Off Broadcasts Between Email Flows
Automated sequences should be the backbone of your email marketing strategy, but there’s another tool you can use to engage your contact list: Broadcasts.
A broadcast is a single email you send to a segment on demand—no automation, no trigger, just a message going out right now or scheduled for later.
To create one:
- Press Broadcast from the Email Flow builder, then Send Email.
- Choose the tag you want to send to and exclude anyone who shouldn’t get it.
- Then, write your subject and body. You can write it yourself, or our built-in AI tool, Stanley, can draft one for you.
- Test send it, press Next, and Stan will tell you exactly how many recipients are in that segment. From there, you can choose to send it instantly or schedule it for later.
Once it’s out, you’ll be able to track your sends, opens, and clicks right there—perfect for a flash sale, a launch, or any announcement that can’t wait on a Flow.
Turn One-Time Buyers Into Repeat Customers on Stan
There you have it—automated Email Flows that reach the right people at the right time, backed by Broadcasts for all your one-off launches or marketing campaigns. It’s the best way to nurture your audience and make sure they actually see your content.
Start with a simple welcome sequence, watch your open and click rates, and refine from there. Every email you add is one more chance to turn a one-time buyer into someone who keeps coming back.
Want more simple tips to grow your Creator business faster? Stan’s Success tab has everything you need—with more lessons and tutorials from Professor T. Try it yourself with a free trial of Stan Store.
FAQ: Stan Store Email Flows
Yes. Email Flows and Broadcasts are Creator Pro features. If you’re on the basic Creator plan, you can upgrade from your Settings tab to unlock them, along with the rest of Stan’s email marketing tools.
Yes. Before you can send any marketing email through Stan, you’ll be prompted to enter a physical business address. It’s a legal requirement for marketing emails, not a Stan-specific rule, so you’ll need it on file before your first Flow goes out.
Emails sent through Stan’s Email Flows and Broadcasts go out from a fixed sender address (username@stanmail.io). You can’t currently send Email Flows from your own custom email address.
You can add images and GIFs directly, but videos need to be shared as links to protect your deliverability. PDFs and external files aren’t supported inside the email itself—as a workaround, host the file on a private landing page with a digital download and link to it.
An Email Flow is an automated sequence tied to a trigger, like a purchase or a specific date—set it once and it runs on its own. A Broadcast is a one-time email you send manually to a segment whenever you want. Flows nurture your audience on autopilot, while broadcasts handle the one-off announcements.
Aim for at least 4–5. It typically takes around seven touchpoints with a brand before someone makes a purchase, so a single email rarely does the job. A short, well-spaced sequence gives you room to build trust, answer questions, and nudge subscribers toward your offer without flooding people’s inbox with a high volume of emails.
Yes, you can import your existing subscribers from the Customers tab. They’ll be tagged by import date, so you can target them like any other segment—perfect for a date-triggered Flow or a broadcast.
Open the analytics view by clicking the analytics icon next to any Flow in your Email Flows tab. You’ll see delivered emails, opens, clicks, click-through rate, and bounces across the date range you choose, so you can identify what’s landing and tighten what isn’t.