TL;DR
A Stan Store Community turns your audience into a live group that can connect, learn, and show up for each other week after week. To launch yours, add a Community product from your My Store tab, create the space, then build out your banner, welcome post, about section, helpful links, and Resources. Customize your settings, add categories and webinars to keep things engaging, and bam—your Community is live and ready to start accepting members.
At a time when loneliness is at an all-time high, there’s something powerful about creating a space that brings people together. And today, I’m going to show you how you can do that by launching your own Community in Stan Store.
Whether you’re building a paid membership, a private group for course students, or just a place for your audience to interact, Stan Store gives you everything you need to build it right from your link in bio.
By the end of this lesson, you’ll know exactly what a Stan Store Community is, why it’s one of the most powerful things you can offer in 2026, and how to build one that feels welcoming from the very first click.
If you’re new here, welcome—I’m Professor T 👋 I help Creator-Entrepreneurs turn what they know into a successful business on Stan Store—the go-to tool for selling digital products, courses, communities, and more without duct-taping five different platforms together.
We’ve got everything you need to host, sell, and market your offers, and we’re constantly rolling out new features to make Creators like you even more successful. So far, we’ve helped Creators earn over $600M on Stan, and my job is to help you become one of them.
In this lesson, we’ll cover:
💜 What a Stan Store Community is and why it’s worth building
💜 Where to add a Community product to your Stan Store
💜 How to set up your home space, Resources, and settings from scratch
💜 How to keep community members engaged with categories and recurring webinars
💜 What the whole experience looks like from your member’s point of view
Let’s get into it.
Prefer to watch and follow along? Check out the full lesson right here or get access to more tutorials inside Stan’s Success tab 👇
Why You Should Build a Stan Store Community
Most of your Stan Store products are transactional. Someone buys, they get value, then the exchange ends. That’s not a bad thing—but it’s a moment, not an ongoing relationship.
A Community is different. It’s the one product where the value doesn’t stop at checkout. It keeps evolving and providing value, because your members are learning from you and from each other, every single time they log in.
And the time to launch a paid Community has never been better. Loneliness is at an all-time high, and people are actively looking for places to feel like they belong. When you launch a Community, you’re not just selling access—you’re giving your audience a room to walk into, a group to grow with, and a reason to keep coming back.
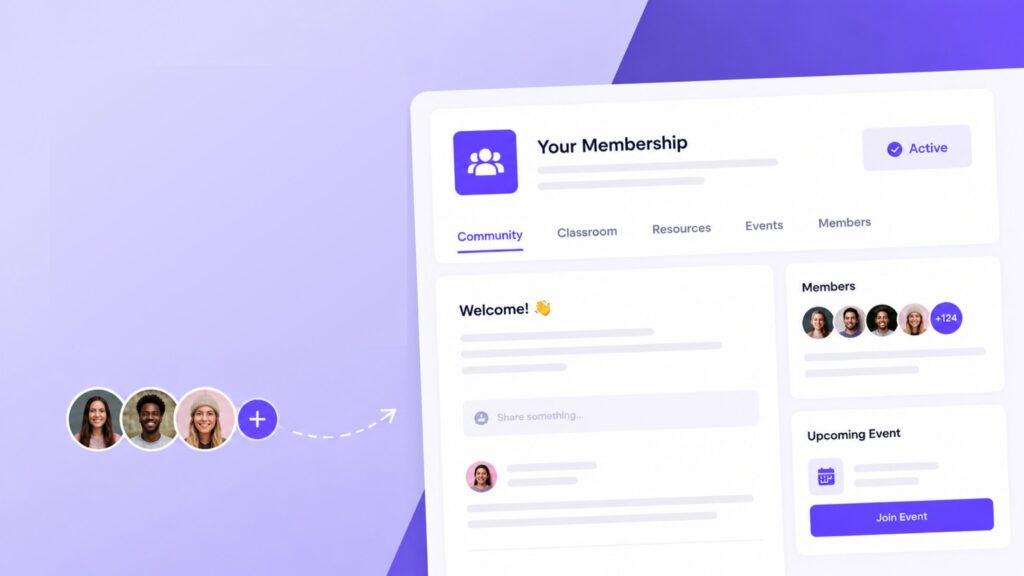
A Community takes your relationship with your audience deeper than any single offer. If you want recurring engagement and revenue—plus a group of people who feel connected to what you teach—this is the product that delivers it.
And unlike selling physical products or other digital offers, a Community is one of the few ways you can make money online without spending a ton of time upfront finalizing your offer. Instead, you can start selling access to your community and steadily improve it over time, rather than needing everything ready pre-launch.
How to Create a Community on Stan Store
Before we start, make sure you’re signed into your Stan Store account so you can follow along. It’s quick and easy to set up a Community on Stan, but I’m going to walk you through the process step-by-step and share a few best practices I’ve learned from years of helping top Creators.
Here’s where to start.
Step 1: Add the Community Product to Your Stan Store
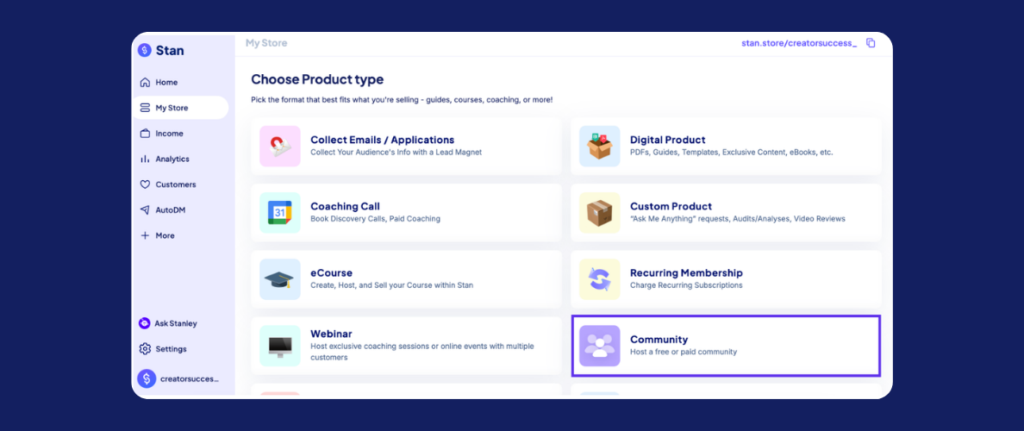
Head to your My Store tab and press Add Product. You’ll see a handful of product types to choose from. Select Community.
Now, before we get into curating your Community, we’ve got to make sure your storefront looks beautiful, because that’s the first thing a potential member will see—and you’ve only got a few seconds to win their attention.
Choose Your Thumbnail Style
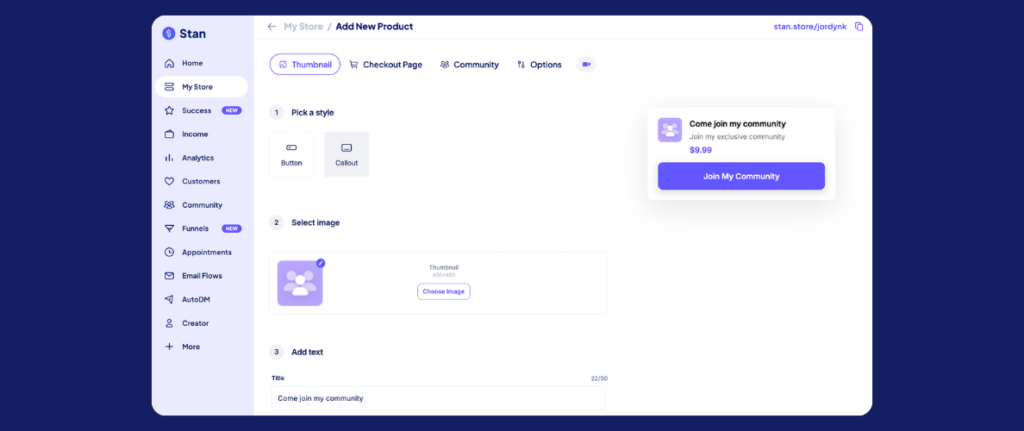
Start by choosing a thumbnail style. This is how your Community will appear on your Stan Store.
Button keeps things compact, which works well if your store is already stacked with products and links and you don’t want any one thing crowding the page.

Callout is my go-to. If you’ve got a strong image, Callout can do a lot of heavy lifting in enticing your customers to click into your Community. It gives you a bigger title and room for a description, so you’ve got more surface area to pull people in.
Whatever you pick, keep the image high quality and tied directly to what your Community is about. And the copy here should build curiosity so your visitor clicks through to the next step.
Step 2: Customize Your Checkout Page
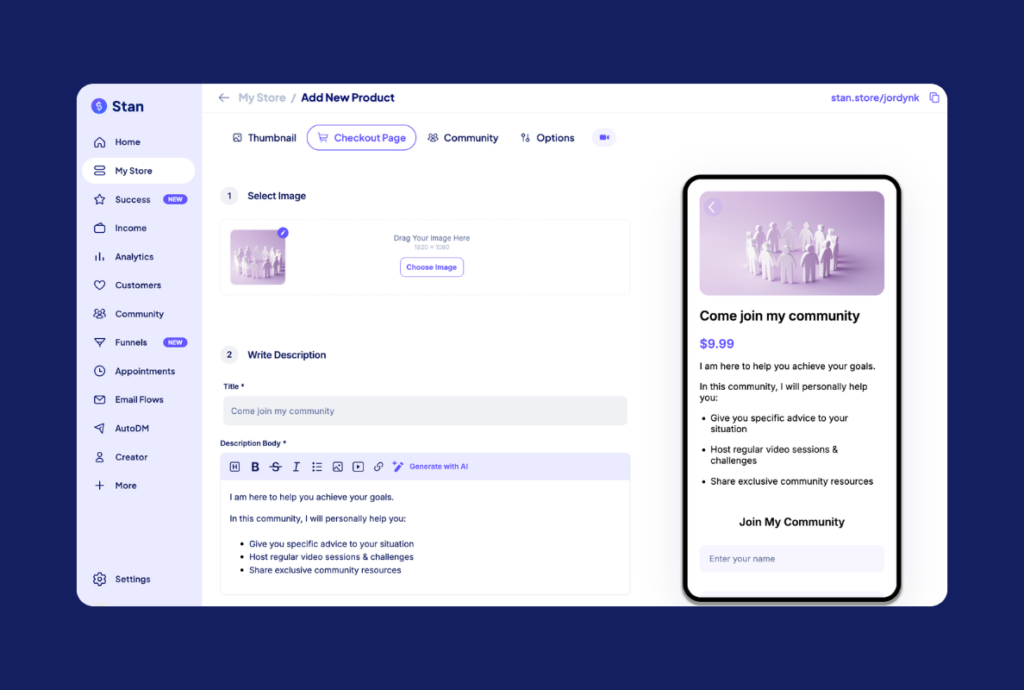
Your checkout page is where you close the sale, so give it the attention it deserves. Pick a banner image that fits your Community, then lay out the value in the description, like:
- What members get on a regular basis, like prompts, videos, or challenges.
- What type of community they’ll be part of, so they have an idea of who else will be inside.
- Why it’s worth joining. Remember to speak to their pain points here!
Update the bottom title and call-to-action copy, then set your price. Most Creators choose to set up a monthly recurring subscription price over a one-time payment, so they earn consistent revenue from the ongoing value they’re delivering. But you can choose to bill yearly, weekly, or daily as well.
You can also set up a fixed subscription term if you’d like, which automatically cancels subscriptions after a set period has passed. This is a great option if you’re only planning on hosting your Community for a seasonal period, for instance. If you want your Community to remain open indefinitely, simply toggle Cancel subscription after off.
Once your checkout page looks the way you like, press Next.
Heads Up! If you want to offer your students flexible payment options, like a payment plan or discount code, you’ll need to upgrade to the Stan Creator Pro plan.
Step 3: Create Your Community
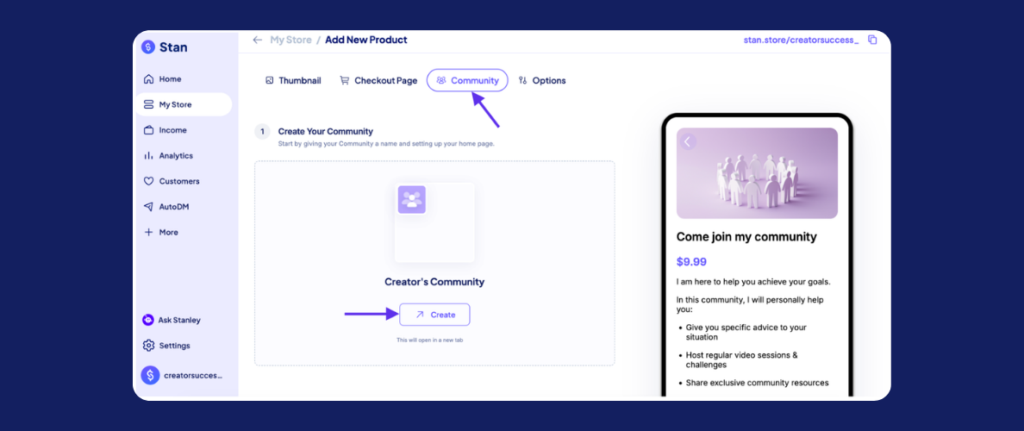
Here comes the fun part—creating the Community itself.
Click into the Community section and press Create. You’ll be redirected to a new page where you can click Build a new community, then Continue to start building out your new space.
Next, give your community a name. You can leave it as the default, or give it something with a little more identity—whatever fits your brand! If you can’t think of a name right away, don’t worry. You can always rename it later in your settings.
Once that’s done, press Create.
Step 4: Set Up Your Community Home Space
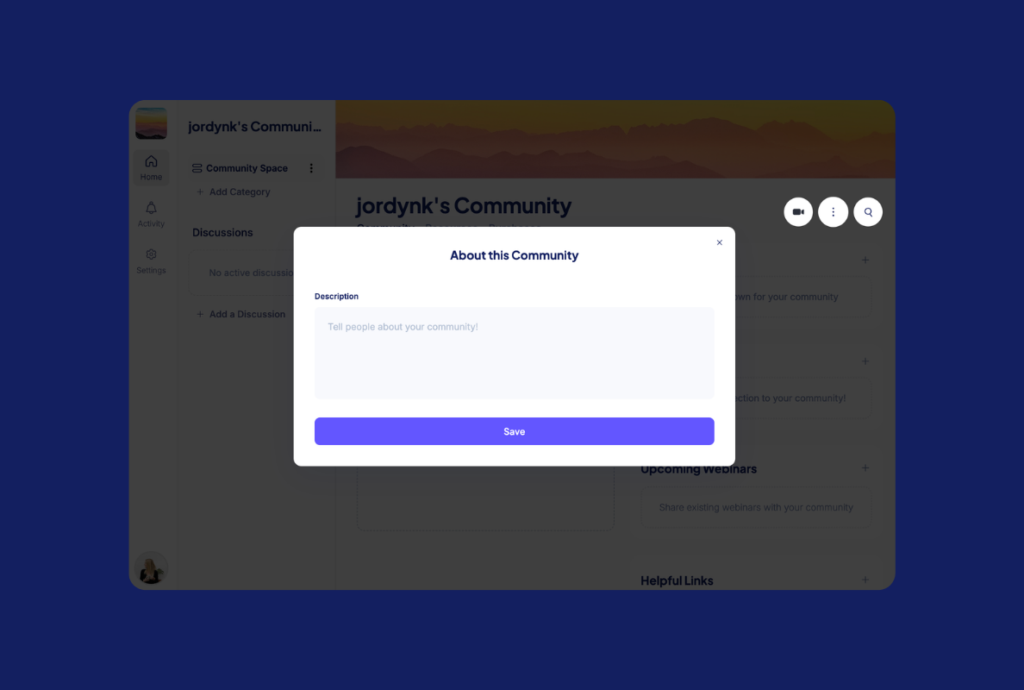
At this point, the bones of your Community are there—we just have to make it feel like yours. Stan makes it easy to tailor every aspect of your Community, so it matches your brand, your voice, and what your community needs.
Here’s where to start.
Update Your Banner Image
Unless you already love the default banner image, press Edit, then choose one of your own files or a photo from Stan’s built-in image library. If the framing looks off, press Reposition, drag it into place, and press Save Position.
Write Your Welcome Message
Draft a welcome post that tells members exactly what this Community is all about where it says “write something.” Then, give them something to do—prompting your community members with an action to take when they first join is one of the best ways to spark engagement early.
For example, if you’re a fashion Creator, you might ask members to drop an intro message with a picture of their favorite outfit. A simple prompt turns a silent room into a conversation.
Not ready to post your message live yet? You can Save as Draft or Schedule it for later, then come back, tweak it, and send it when the timing’s right.
Pro Tip: If you have a Creator Pro account, you can attach an email notification to any Community post so it reaches members even when they’re not logged in. It’s a great nudge to pull people back into your Community—but use it with intention. Save it for the posts that truly matter, like a live call or a special guest webinar, so you’re driving people back instead of wearing out their inbox. If you’re on the basic Creator plan, you can still build and run a Community. You’ll just need to upgrade when you’re ready to unlock automated email notifications.
Fill In Your About Section
The About section is where you can give community members a lay of the land—spelling out what happens here, how often, and what they can expect from showing up.
This is also the place to set the tone for your cadence. A Community lives and dies by the value you keep pouring into it, so decide on a rhythm you can sustain—a weekly outfit breakdown, monthly style challenges, live Q&As. Whatever fits your niche.

The more consistently you deliver value, the more likely your members are to log in, engage, and stick around.
Once you’ve written your About section, press Save.
Add Helpful Links
Next, include some Helpful Links. These point members to your short-form content, long-form articles, blogs, or anything that helps them unlock more value.
For example, for a fashion community, I might include links to:
- An outfit-of-the-day inspiration post
- A free color palette guide to help people coordinate their looks
- Your 3-minute capsule wardrobe how-to YouTube video
You can add as many links as you want—but keep it organized around one clear outcome. A pile of links pointing in every direction gets overwhelming fast. Curate them toward the transformation you want members to walk away with.
Step 5: Build Out Your Community Resources Section
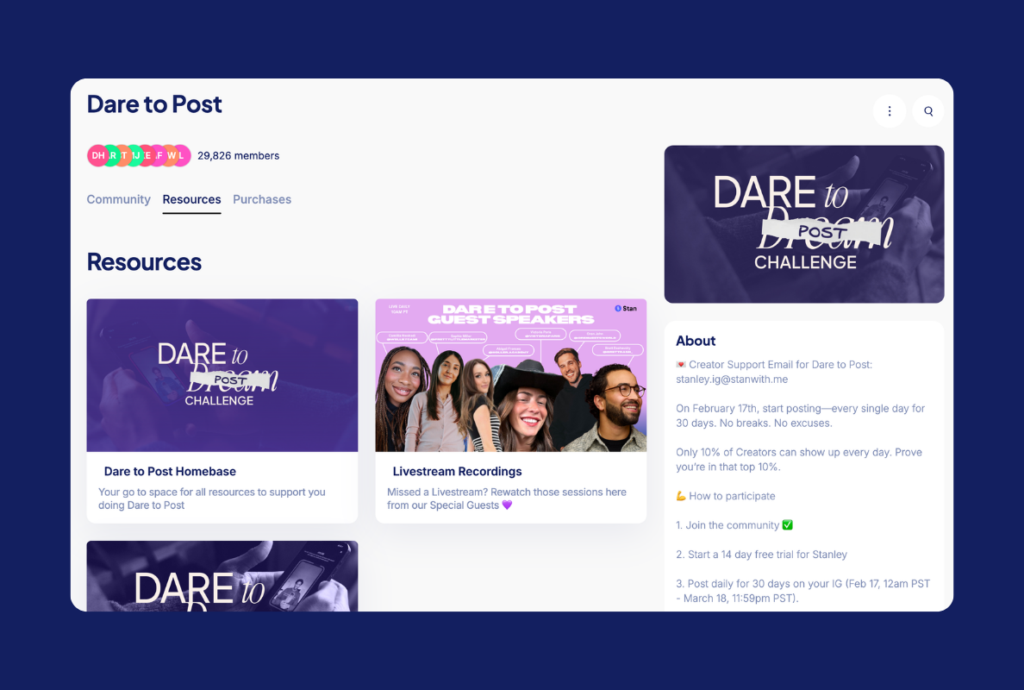
Think of the Resources section as a deeper version of Helpful Links. While Helpful Links can only send members outside the Community, Resources let you upload files directly—giving each one a name, a banner image, and a description, so it functions like its own free product living inside the space.
You can make your community feel like true insiders by sharing resources that live exclusively inside this space—gated tips, strategies, and content they won’t find anywhere else.
Maybe it’s a guide people would normally pay for on your Stan Store, but members get it free just for joining. Or strategies and exclusive tactics you’re only sharing with this community. Upload it here so they can open it, download it, and pull even more value out of their membership.
Every resource you publish creates its own block, so you can stack up a whole library over time.
As your Community grows, refresh your resources on a semi-regular basis and make sure you keep everything focused on the purpose of the community. People came here to connect and learn, so don’t bury value under a pile of resources they struggle to navigate through.
Heads Up! Community members will be able to easily access all products they’ve purchased from your Stan Store under the Purchases tab. No need to take any action here—products will automatically populate in member’s accounts based on their purchase history.
Step 6: Customize Your Community Settings
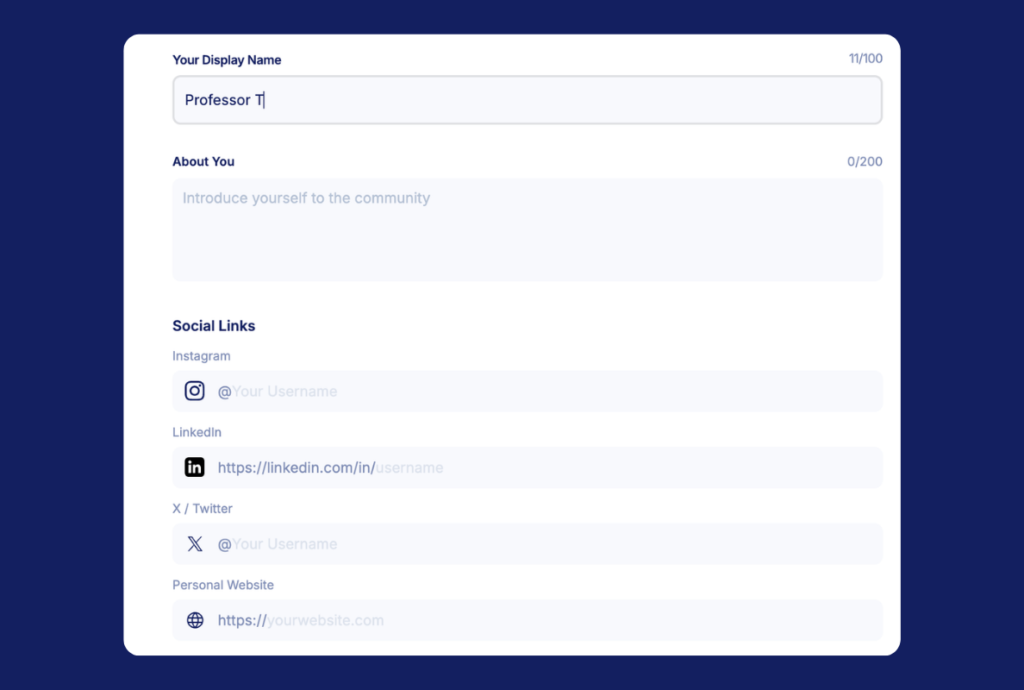
Now let’s tighten things up and make this space unmistakably yours. On the left-hand side, click Settings. This is where you can rename your Community if the earlier name didn’t stick.
You can also set your Community image style:
Banner stretches your image across the top.
Side tucks it into the top right corner.
I recommend testing both to see what fits.
Then, choose your theme. You can opt for light or dark mode by clicking Theme and toggling your preferred option on.
Next, under your profile:
- Update your profile picture
- Set your display name
- Write a short bio
- Add your social links—Instagram, LinkedIn, Twitter, a personal website, or wherever your community can find you online
Once you’ve updated your profile, set your intro message. This is the first card new members will see when they join, so make it count. It’s your chance to get them excited the moment they step into your space.
Finally, under notifications, decide how often members should receive email recaps of what’s happening inside the community—like who posted, what webinar’s coming up, which resource just dropped. Daily bundles everything into one email a day, while weekly keeps updates lighter.
Step 7: See It From Your Member’s Point of View
Before you start promoting your Community, make sure you test out the customer journey—experiencing the whole thing exactly as a new member would. You can do this by setting your Community to free, then purchasing it as if you were joining for the first time.

From your customer’s point of view, you’ll:
- Purchase Community access and hit Join.
- Enter your information, then be prompted to set a password. This is how members will be able to log into the Community, so make sure you remind people to keep it saved somewhere so they don’t lose access. Once you’ve input yours, click Set Password.
- Edit your profile photo, display name, and bio, add your socials, and press Next.
- See the intro message you set earlier as soon as you enter the community. You’ll also be able to see other members, categories, resources, the about section, and any other products you’ve purchased sitting in My Purchases.
- Make sure you can post, download resources, tweak your settings, or reset your password.
Once everything looks the way it’s meant to, exit the community and return to your Stan Store builder to update the Community’s price.
And that’s it! Your Community is live and ready to start selling 🎉
Grow and Retain Members With These Community-Building Best Practices
In 2026, people are more skeptical about what they consume online and who they trust. And now that anybody can spin up identical digital products, your competitive edge comes down to building offers that no one can replicate: like access to you. Your insights. The community you’ve worked so hard to build.
That’s why community-building is becoming so key to success in today’s Creator economy. But it’s not as simple as launching a Community on Stan Store and just letting it sit there.
To grow and retain members, you need to be intentional about keeping people engaged in what your space has to offer. Here are my go-to tips for creating a stand-out Stan Community experience members can’t get enough of.
Add Categories to Keep Discussions Organized
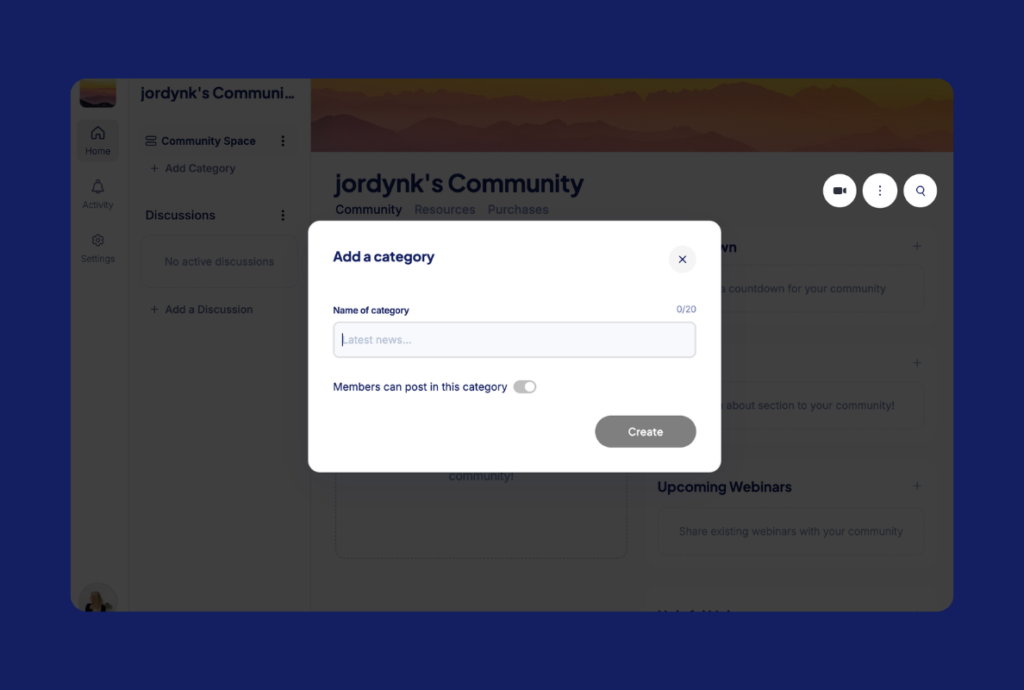
One giant, long-scroll discussion feed can get messy quick—especially once your Community grows past 100 members. Categories fix that.
They split your Community space into organized subsections that are easier to navigate and keep discussions focused—so members can easily find what they need and engage.
To create categories, press Add Category in the top left corner and give it a name. You can let members post inside topics, or toggle it off so only you as the admin can add posts. I usually recommend keeping posting on to keep the conversation flowing.
Once you’re ready, press Create, and your category will show up in the top left.
Now, when you click into a new category, you’ll find a clean slate to spark discussions around a specific topic. Drop a welcome post so members know what the space is for, then pin it so it always sits at the top of your Community’s feed.
To reorder, rename, or delete categories later, hit the three dots next to Community Space and choose Edit Categories.
Set Up Recurring Webinars
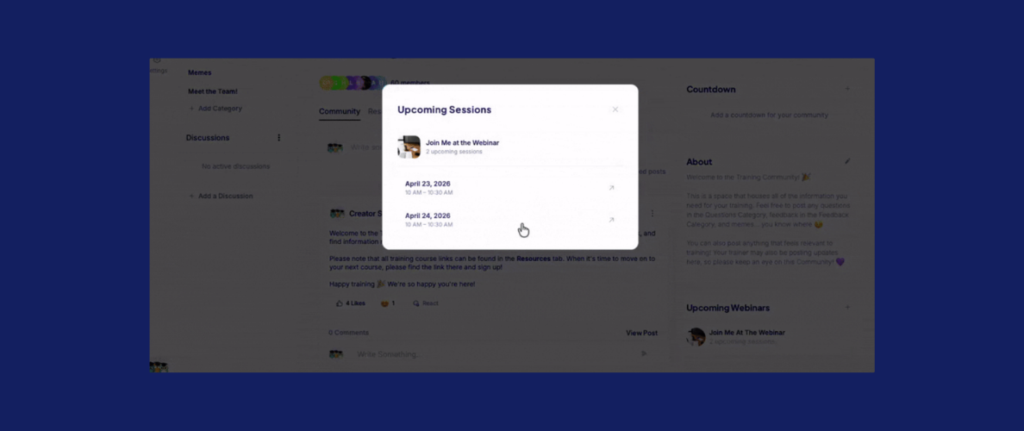
Another way to boost engagement is to share a regular cadence of webinars. You can press the + next to Upcoming Webinars to add an existing webinar from your Stan Store. Or you can press + Create New Webinar to build one on the spot.
When you add a new webinar to your Community, you’ll be redirected to Stan Store’s webinar builder, where you can edit the page like any other checkout page and add a date-and-time slot.
Pro Tip: Since you’re offering these webinars to people who already paid to join, set them to $0 and make them a landing page. That keeps them off your public storefront and reserved purely for your Community members—a real perk of being inside.
Once you’ve finished setting up your webinar, press Next, then Publish. Head back to your Community, refresh, and add the webinar to your Upcoming Webinars section.
Now, members will be able to choose a webinar slot and be taken straight there.
⭐️ New to webinars? We’ve got a full lesson on them in the Success tab, where I’ll walk you through a step-by-step process for setting one up.
Bring People Together With A Stan Store Community
And just like that, your Community is live on your Stan Store, with a welcoming home space, a stocked Resources library, organized categories, and webinars that give your members a reason to keep showing up.
The magic isn’t in the setup—it’s in the value you keep bringing week after week. So start with a solid foundation, show up consistently, and let the space grow alongside the people in it.
Want more tips to grow your Creator business? Stan’s Success tab has everything you need—with more lessons and tutorials from Professor T. Try it yourself with a 30-day free trial of Stan Store.
FAQ: Stan Store Communities
No. You can run a Community with the standard Stan Store plan for a flat rate of just $29/month. You’ll only need to upgrade to Creator Pro for add-ons like email marketing tools, including automated email notifications when you make Community posts.
Helpful Links send members to external content that lives outside your Community, like a blog post, a video, or a link to a lead magnet PDF. Resources let you upload files directly into the Community—each with its own name, banner, and description—so members can open and download them without ever leaving the space.
This keeps your Community engaged within your space while giving them exclusive insider content that isn’t readily accessible beyond the Community.
Use categories. Press Add Category to create topic-specific spaces, name each one, and decide whether members can post or only view. You can pin a welcome post inside each category and reorder or delete them anytime from Edit Categories.
That’s up to you and your niche, but consistency is what keeps members engaged. Many Creators land on a weekly cadence—think weekly breakdowns, monthly challenges, or live Q&As. The more reliably you deliver value, the more your members will log in and stay active.
Run a buyer’s journey test. Set the Community to free, purchase it as if you were a first-time member, set your password, and walk through the full join experience. It’s the best way to catch anything that feels off before your real members ever see it.
No—Stan Store charges zero transaction fees on all products, so you keep 100% of every sale you make. Just pay the standard Stripe or PayPal processing fees, which are typically around 2.9% plus 30 cents per transaction.
You can’t currently match your Stan Store Community to your brand colors, but you can tailor your Community’s appearance with banner images and theme options like light or dark mode. This helps you create an on-brand, professional look that aligns with your overall Creator brand.
Share social media content that speaks to who your Community is for, the value it provides, and why someone should join. Try to talk about it semi-regularly and make it super easy for your audience to access by using a link in bio tool, like Stan Store, to host your Community and other Stan offers right from your social profile.