TL;DR
A Stan Store course turns your knowledge into an sequence of lessons your students can work through—perfect for high-intent buyers and medium-to-high ticket offers. To launch yours, add an eCourse product from your My Store tab, style your checkout page, then head to the Course tab to build your homepage, modules, and lessons. Set each module to Publish, Drip, or Draft, load your lessons with video and supporting materials, drop your course link into the confirmation email, and hit publish. Then, test it out to experience it firsthand before you start selling.
Welcome to the Stan Store Success Series with Professor T! In this lesson, we’re breaking down how to package what you know into lessons your community can learn from: an online course.
By the end of this step-by-step guide, you’ll know when to create a course vs. other types of digital products, how to create an online course on Stan Store, and how to control what your students see (and when they see it).
If you’re new here, I’m Professor T 👋 I teach Creators how to create and sell digital products with Stan—the best link in bio store for Creator-Entrepreneurs who want to build a real business without wrangling together five different tools or paying transaction fees.
Stan makes it easy to host and sell anything right from your social media profile: mini courses, community access, digital downloads, memberships—you name it! Stan Creators have already earned over $600M in sales on the platform, and I’m here to help you become one of them.
In this lesson, we’ll cover:
💜 Why you’d choose an online course over other product types
💜 Where to add a course to your Stan Store
💜 How to build your course homepage, modules, and lessons from scratch
💜 What Drip, Publish, and Draft do for your student experience
💜 How to test everything before you push it live
Let’s get after it.
Prefer to watch and follow along? Check out the full lesson right here or get access to more tutorials inside Stan’s Success tab 👇
Why Build a Course Over Other Digital Products
Before we dive into things, why should you decide to build a course in the first place?
Stan Store gives you plenty of ways to sell what you know—digital downloads, custom products, coaching sessions. Each one has its place and can be used to appeal to very different audiences:
- A digital download is generally small and self-contained with a clear focus, like a checklist or a one-page guide. It makes for a great first product, but isn’t the best option for going more in-depth.
- A custom product is usually a one-off offer instead of a connected journey.
- A coaching call lets people book 1:1 time with you right from your Google Calendar. But you can only cover so much ground before you’re booking session after session to finish your thoughts.
- A course is what you should create when whatever you’re teaching is too big to fit into a download, call, or custom offer. It’s your full process, broken into modules and lessons delivered in a specific order, so your customer moves through a journey the same way you’d walk them through it yourself.
That’s also why courses tend to command a medium-to-high ticket price and attract your most committed buyers. When someone wants the full transformation over a quick win, a course is typically the best product to deliver it.
So if what you teach works best long-form and in sequence, it might be time to create a course—and I’ll show you how.
Heads up! Anyone with a Stan Store plan can create an online course. But you’ll need to upgrade to the Creator Pro plan if you want access to advanced features, like payment plans, discount codes, Funnels, Order Bumps, and email marketing.
How to Create an Online Course on Stan Store
Ready to add an online course to your own store and start selling? Before we get started, make sure you sign into your Stan Store account so you can follow along.

Step 1: Add the eCourse Product to Your Stan Store

Head to your My Store tab and press + Add Product. Then, choose the eCourse product type.
The first thing you’ll want to do is make sure your new product’s thumbnail, product title, description, and checkout page look pristine—that’s what a customer sees first.
Choose Your Course Thumbnail
Start by picking a style:
- Button is clean and works well if your store already has a lot of products and links, so it doesn’t feel cluttered.
- Callout is my personal favorite and the perfect balance—it enlarges your photo and gives you room for a description that entices customers about what the course is really about.
- Preview will give visitors a glimpse of your modules, but it takes up a lot of real estate, so I recommend only using it if you just have a few products in your store.
Whatever you choose, keep the image on theme and on brand, and customize your title, subtitle, and button to be as enticing as possible.
Customize Your Course Checkout Page
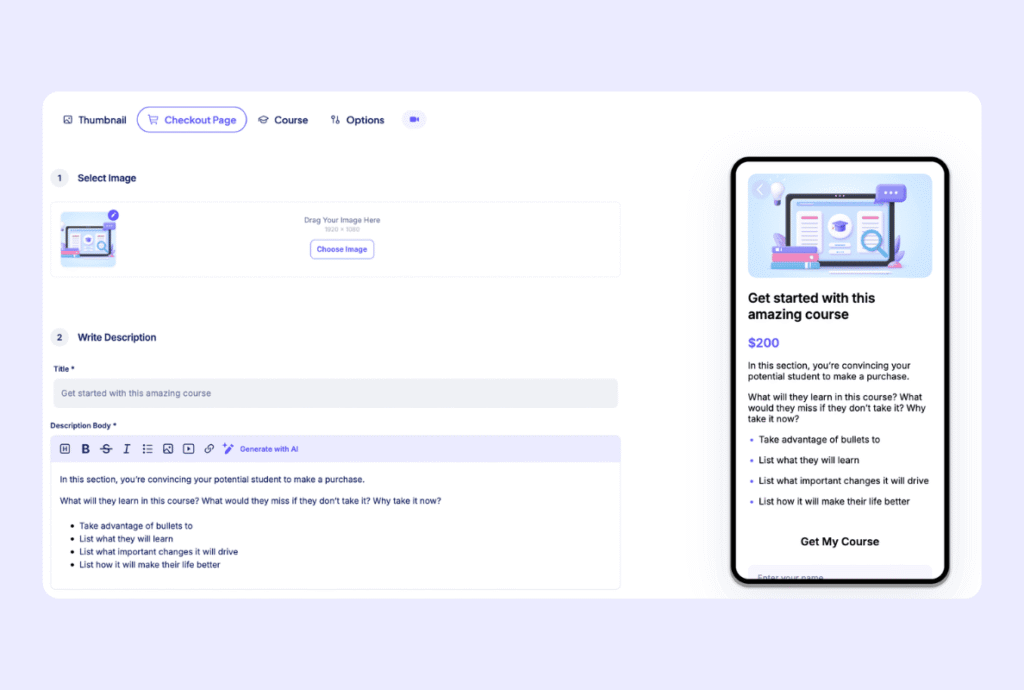
Your checkout page is where the bulk of your selling happens—it’s the last thing someone reads before they pay with their credit card.
That description body is where you sell them on your offer, so it’s worth taking your time to get right. We’ve got a whole lesson on checkout pages and confirmation emails in the Success tab, so lean on that for copy tips.
This is also where you’ll be able to set pricing for your course—either as a one-time payment or recurring subscription. Most Creators tend to price courses at a medium-to-high-ticket price since they provide more value and take longer to create than other digital product types, but it really depends on your niche and what you include within your course.
Heads up! If you want to offer your students flexible payment options, like a payment plan or discount code, you’ll need to upgrade to Creator Pro.
Step 2: Build Your Course Homepage
Now, let’s go a layer deeper. From now on, the bulk of your editing will be in the Course tab—and we’re starting with the homepage.
This is the first page your students will land on after they log in to your course, so you want it feeling genuinely welcoming. I recommend leading with a strong photo, a clear description, and a few bullets on what to expect. To set it up, press Edit Page.
Editing Your Course Homepage
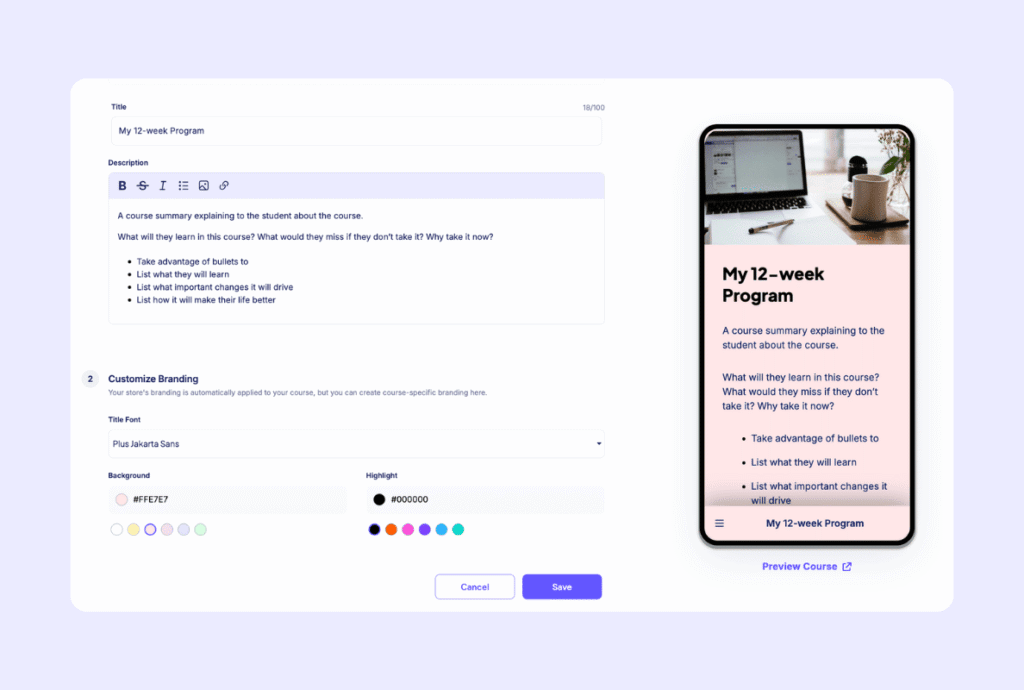
Choosing your homepage image is a lot like choosing your thumbnail—it’s okay to use the same image as long as it keeps things on theme and makes your students feel welcomed (not sold to).
Next, update your landing page title. This can be the name of your course or a welcome message. Write a description that goes a little more in-depth than the one on your checkout page. It should cover whatever you want your students to know before they start the first module of your course.
Finally, customize your branding. Choose a font and set your background and highlight colors. Make sure you use contrasting colors so that your students can easily read the text on the page.

When everything looks the way you want, press Save. And now for the fun part—designing your course modules.
Step 3: Create Your Course Modules and Lessons
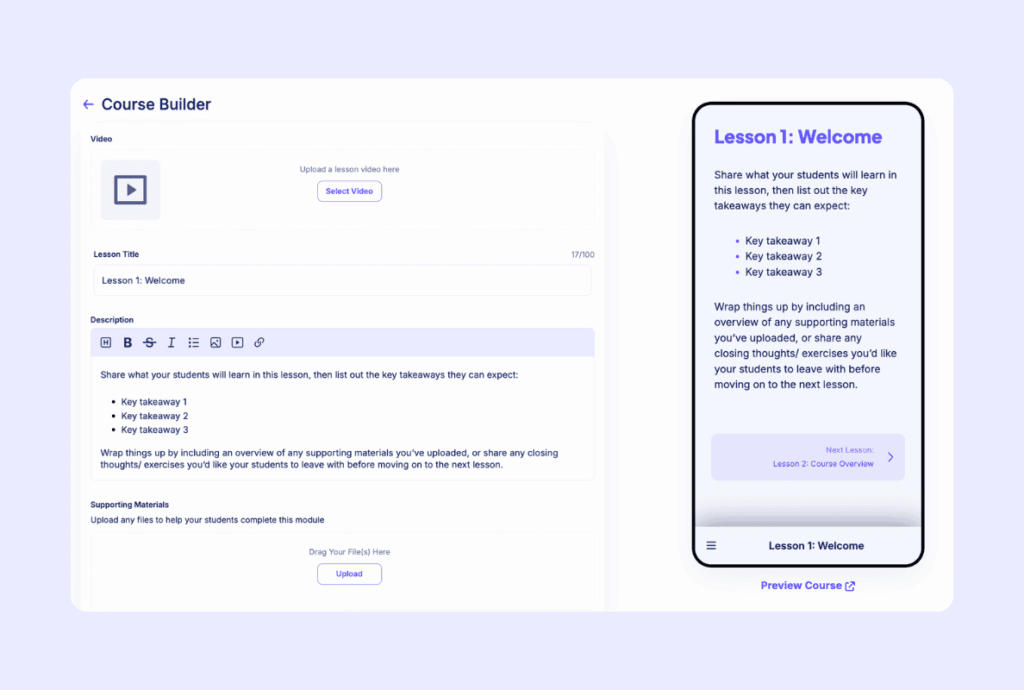
Next, navigate to the Add modules section of your course. When you create a new course within Stan Store, it’ll come with three preset modules and lessons by default to give you a starting point, but you can easily add, remove, and customize each one.
On Stan, each course module is like a chapter, and each lesson is essentially a sub-chapter inside a specific module. Think of it like this: the module sets the overarching topic, and the lessons go a layer deeper.
That’s the whole point of a course—you’re taking someone through an organized flow instead of throwing a bunch of information at them at once. Here’s how to set yours up.
Rename Your Modules
First, customize your course modules. You can do this by pressing the three dots next to any module, then selecting Rename Module. Enter the module name and click Confirm.
Set Each Module to Publish, Drip, or Draft
Next, choose when you want your students to see each module. This is where you can control your course experience by selecting whether you want to set your module to:
- Publish, which means the module is live and your students can access it whenever.
- Draft, meaning a module is hidden from your students completely. It’s perfect for parking a module while you finish building it.
- Drip, which means the module unlocks a set number of days after someone enrolls.
You can customize this for each module by selecting the three dots next to a module’s name.
Drip is where you can get creative with how you want your students to interact with the course. For example, you can set every module to drip 7 days after purchase to build anticipation during a launch period before new students can dig in. Or you could publish your first few modules and drip the rest week over week—buying you time to keep building or pace your students’ learning at a rhythm you set.
Running a self-paced course? Publish everything and let your students learn on their own timeline. It’s completely up to you, your strategy, and where you’re at in your business.
Pro Tip: If you want to make sure that your customers know when a Drip module is open, toggle on Update Customers About Drip Module. Once the drip window passes, this email will pull them right back in to keep going. You can personalize the email subject line and body, but make sure you include the Course name and Module name so they know which course it’s for.
Fill In Each Lesson
Finally, it’s time to add lessons to your modules and deliver a course that’s packed with value.
Start by clicking into an existing lesson or selecting Add Lesson. Then, click Select Video to upload the video lesson. Video tends to do really well in a course, so I highly recommend using them throughout each lesson.
Once your video is loaded, set your lesson title, write your description, and upload any supporting materials—like a checklist, a template, a self-paced workbook PDF. Whatever you think would pair well with that lesson.
When it’s ready, press Publish, and move on to the next lesson. You’ll continue this process until you’ve completed all the lessons in your course.
Step 4: Preview Your Course From Your Student’s Point of View
As you’re building things out, you can see what your course looks like by clicking Preview Course underneath the mobile preview. I recommend doing this often—seeing it the way your students will is how you catch anything that feels off before it goes live.
Here’s what your student sees:

- The homepage shows up first, with your new font and welcome copy.
- A published module is fully open and ready for them to dive into as soon as they sign in.
- A drafted module won’t appear at all.
- A dripped module will have a little lock icon with a countdown timer, so your students always know when the next module will unlock.
When you view a live lesson in preview mode, you should see your video right up top with your title, description, and any supporting materials below it. When a student clicks a file, it should download straight to their device.
Remember: from your student’s point of view, none of this feels cumbersome and technical. They don’t see the drip logic or the draft toggles. They just see the right lesson unlock at the right moment—which is what makes a course feel like a guided journey instead of a folder of files.
Step 5: Personalize Your Confirmation Email
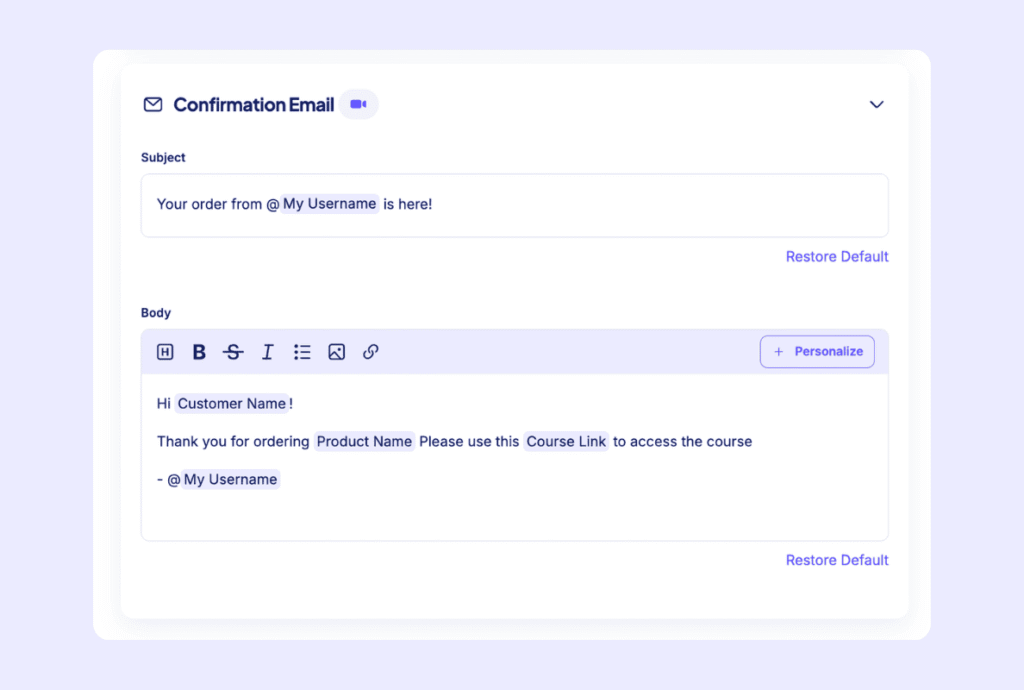
Before you publish, hit Exit Preview and navigate to the Options tab at the top of the page. Scroll down to the confirmation email section and toggle it down so you can personalize yours.
Your confirmation email is what students will receive when they buy your product. You can customize the default copy to match your tone and voice, but make sure you keep the course link in the body of the email.
That’s what your students will click to get access to everything you just built. So if you accidentally leave it out, they’ll be locked outside the course they paid for—which can damage your reputation and the trust you’ve worked so hard to build with your audience.
Heads up! The purple highlighted fields shown in your confirmation email will auto-populate with the information saved inside your Stan Store account, like your customer name, product name, and course link.
Step 6: Publish and Test The Live Experience
At this point, your course should be fully set up inside your Stan Store . So when you’re ready, scroll to the bottom and hit Publish—your course is officially live 🎉
Before people buy your course, there’s one last important move I’d recommend to give you 100% confidence—and many Creators skip it.
Even though you’ve already previewed your course, I suggest test-driving the live version. Set the price to $0, go to your storefront, and run through the checkout experience. Purchase the course just like your buyer would, and double-check to ensure the confirmation email hits your inbox.
You should be able to access the course from the post-checkout thank-you page or the confirmation email. Just press Start Now, and you’ll land right inside the course with access to everything you just built.
Pro Tip: About 24 hours after a student enrolls and opens the course, they’ll be prompted to create a username and password, which they’ll need to log back into the course later. I recommend calling it out in your confirmation email or welcome copy so they know to keep those credentials somewhere safe.
And That’s How You Create an Online Course on Stan
There you have it—a full course, live on your Stan Store, with modules that unlock exactly when you want them to and lessons your students can move through at the right pace 🚀
The beauty of online courses is that you can continue to iterate on yours and introduce new lessons based on your students’ feedback. So don’t be afraid to keep things simple at first and grow from there.
Start with sharing what you know best, get it live, and refine it as real students work their way through. After all, the best courses are built that way—one lesson, idea, and iteration at a time.
Want more simple tips to grow your Creator business faster? Stan’s Success tab has everything you need, with more lessons and tutorials from Professor T. Try it yourself with a 30-day free trial of Stan Store.
FAQ: Stan Store Courses
Creating a course makes sense when you want to teach your audience something long-form and sequential that needs modules and lessons to cover properly. Digital downloads are better for higher-level tips, checklists, and trackers. And coaching calls work best when someone needs custom advice tailored to them or more 1:1 support.
Overall, courses are great for high-intent customers who are willing to pay a medium-to-high ticket price point. And Stan Store is the perfect platform to host yours on without complex tech or multiple subscriptions.
Dripping releases a module at a set number of days after a student enrolls, rather than making everything available as soon as someone joins. You can use it to build anticipation, pace your students week over week, or buy yourself time to finish later modules while you’re already live. You can also set your dripped modules to automatically notify your students via email as soon as a new module opens.
The course link. Everything else in the email helps, but that link is essential. It’s what your students will use to log in and access their lessons—so it always needs to be in the body of your confirmation email.
Yes. Roughly 24 hours after enrolling and opening the course, your students will be prompted to setup login credentials so they can pick up where they left off anytime. I recommend including a warning in your confirmation email so they know to save their login info somewhere safe.