TL;DR
Stan Store AutoDM automatically sends a DM with your link the moment a follower comments or messages your keyword on Instagram—so one viral post can turn hundreds of comments into leads without you lifting a finger. To set one up, connect Instagram, create an auto-reply, set your trigger and keywords, choose your posts, turn on comment-back, write your message with a link, and hit Publish. Then test it yourself before you share it with the world.
Are you still manually replying to every Instagram comment? That might work for a little while—but as soon as a post pops off, you’ll be bombarded by comments like “Link?”, “Where do I get this?”, “Send me the guide!”
Suddenly, you’re staring down 400 people who all want the same thing. So you start copying and pasting the same DM, one by one, until your thumbs give out and half those warm leads have already moved on.
There’s a much better way to handle this. It’s called AutoDM. And today, I’m showing you how to set one up inside your Stan Store so every one of those comments turns into a lead on its own.
By the end, you’ll know exactly what an AutoDM is, how to connect it to Instagram, and how to build your first keyword-triggered reply from scratch—so a single post can send your link out hundreds of times without you needing to lift a finger.
If you’re new here, I’m Professor T 👋 I help Creator-Entrepreneurs turn their audience into leads and income on Stan Store—the link in bio store built for selling digital products, courses, communities, coaching, memberships, and more without stitching together a bunch of different tools.
We’ve helped Creators earn over $600M so far, like Mehr, Zee, Steph, and Jalen. And with my help, you could be next.
In this lesson, we’ll cover:
💜 What Instagram DM automation is and why it turns comments into customers
💜 How to connect the Stan AutoDM feature to your Instagram
💜 How to build your first keyword-triggered auto reply
💜 What your followers will see and how to test it yourself
Prefer to watch and follow along? Check out the full lesson right here or get access to more tutorials inside Stan’s Success tab 👇
What AutoDM Is and Why It Works
Have you ever seen Creators share posts that say to comment a specific word to receive something—whether it’s their downloadable guide, favorite tool, or a link (like their Stan Store URL)? That’s called DM automation.
Instead of manually sharing something on Instagram with every person who asks for it, AutoDM allows you to send a direct message when someone comments a keyword automatically. It’s one of my favorite business growth strategies because you can set it up ahead of time and seamlessly nurture your audience toward a sale while saving HOURS each week.
Here’s how it works:
- You pick a keyword like “Travel Guide.”
- You share a post on Instagram and tell your audience to comment or DM that word.
- The second someone replies, Stan instantly leaves a reply comment and sends them your custom message with your link inside it. That’s it!
The days of ending every post with “Check out my link in bio” are over. People want a frictionless experience when they’re scrolling their social feeds, and AutoDM gives it to them.

Plus, it’s one of the top lead capture tactics you can use. Think about it: Someone commenting your keyword is raising their hand and saying, “I want this.” That’s about as high-intent as a follower gets. AutoDM meets them in that exact moment—while they’re still excited—instead of hours later when you finally get around to replying to comments.
How to Sell On Autopilot With Stan AutoDM: 5 Steps
One post. Hundreds of hands raised. Every single one gets your link in seconds. And it only takes five minutes to set up. Here’s how.
Step 1: Connect Instagram to Your Stan Store
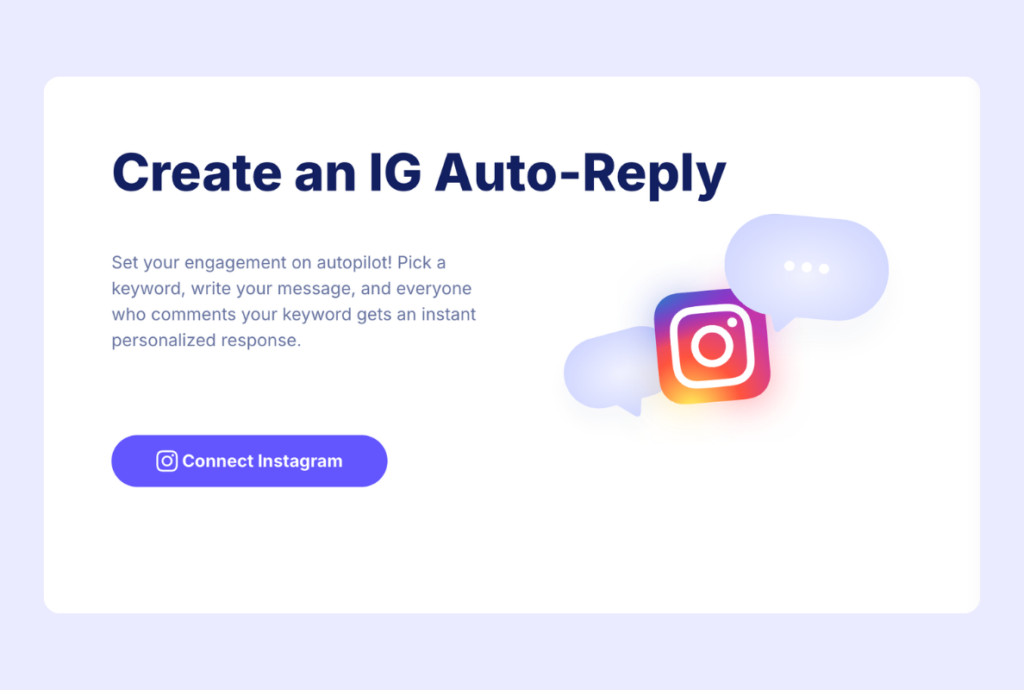
AutoDM runs on Instagram, so before you do anything else, we’ve got to connect your Instagram account to your Stan Store. There are two ways to do it:
1. Connect Through Your Stan Store Settings
In Stan Store, go to your Settings, click Integrations, then click Connect next to Instagram. Enter your login credentials and hit Allow to grant Stan permission to access your Instagram. Then, hit Done.
2. Connect Through the AutoDM Tab
Alternatively, you can click the + More tab where you’ll see AutoDM with a grayed-out toggle. Switch AutoDM on, and it’ll pin to your left sidebar so it’s always one click away. From there, click Connect Instagram, enter your Instagram login, and hit Allow.
Once your Instagram account is linked to your Stan Store, your AutoDM tab is ready to build in.
🚨 Heads Up! If you’re currently running ManyChat or another tool that manages your Instagram DMs, you’ll need to disconnect it first. Two apps fighting over your inbox is a recipe for missed messages.
Step 2: Create Your First Auto Reply
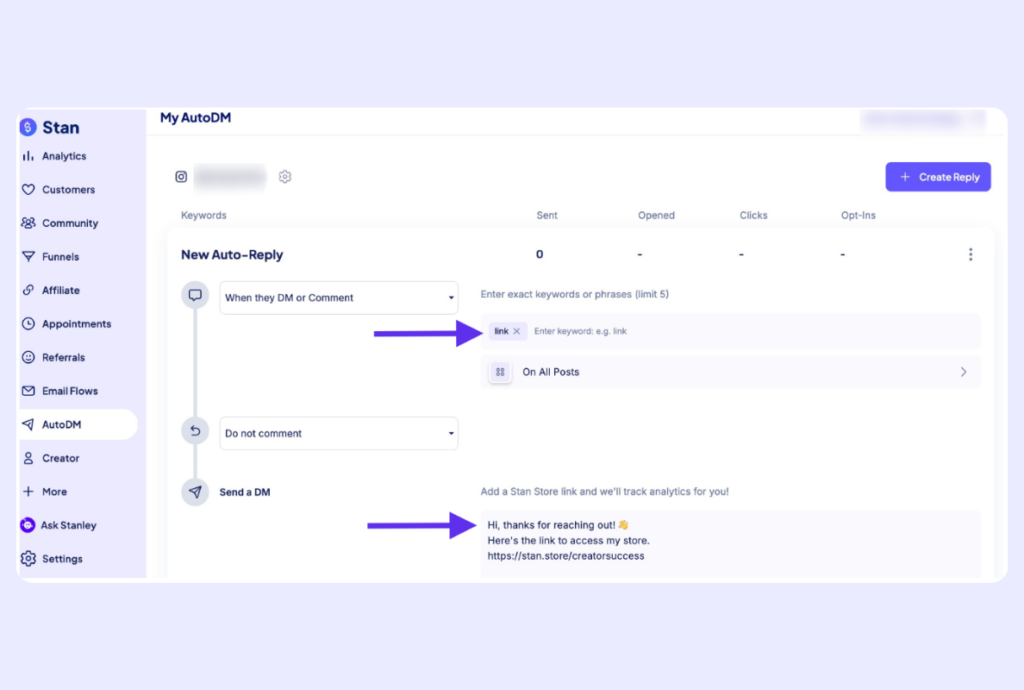
With Instagram connected, open your AutoDM tab and press Let’s Go! Then press Create Auto Reply.
Now you’re inside the builder, where we’ll configure everything top to bottom—your trigger, your keywords, your posts, and the message itself. I’ll walk you through each piece.
Set Your Trigger
Your trigger decides what a follower has to do to kick off the automation. You’ve got three options: when they DM, when they comment, or when they DM or comment.

I almost always recommend DM or comment. Here’s why—you never know how a follower is going to respond to your content. Some will comment. Some will slide into your DMs. Some will get the instructions mixed up and do the opposite of what you asked. Selecting both means nobody slips through the cracks.
Add Your Keywords
Next, head to the keyword or phrases field. This is where you’ll enter the keywords that should trigger your AutoDM. You can add up to five slots per automation.
Just type in your desired word or phrase and press Enter after each one to activate them.
Stan AutoDMs aren’t case-sensitive, so you don’t need to waste a slot on variations like “guide” vs. “GUIDE”—they’re treated the same. Instead, use those five slots to catch the ways people might mistype your word in real life. For example, if your keyword is “guide,” you might add “guode,” “guyde,” and “guide!” Want to be thorough? Look up the most common misspellings of your word, or go off what you’ve seen your own audience type. The goal is to make sure a typo never costs you a lead.
⭐️ Pro Tip: Choose a keyword that’s specific to what you’re sending, and make sure it’s not a commonly used word so that you only DM the people who are genuinely asking for what you’re offering vs. commenting on your post.
Step 3: Choose Your Posts and Turn On Comment-Back
Select Your Posts
Now, choose the intended posts your AutoDM ties back to. You can press Enable for All Posts, or pick specific ones if you want the keyword isolated to a single piece of content.
I usually go with all posts. Same logic as the trigger—you want to cover your bases so that no matter where someone drops your keyword, they get the goods. It even works on your Instagram Stories, so a keyword reply to a Story fires the AutoDM too.
Enable Comment-Back
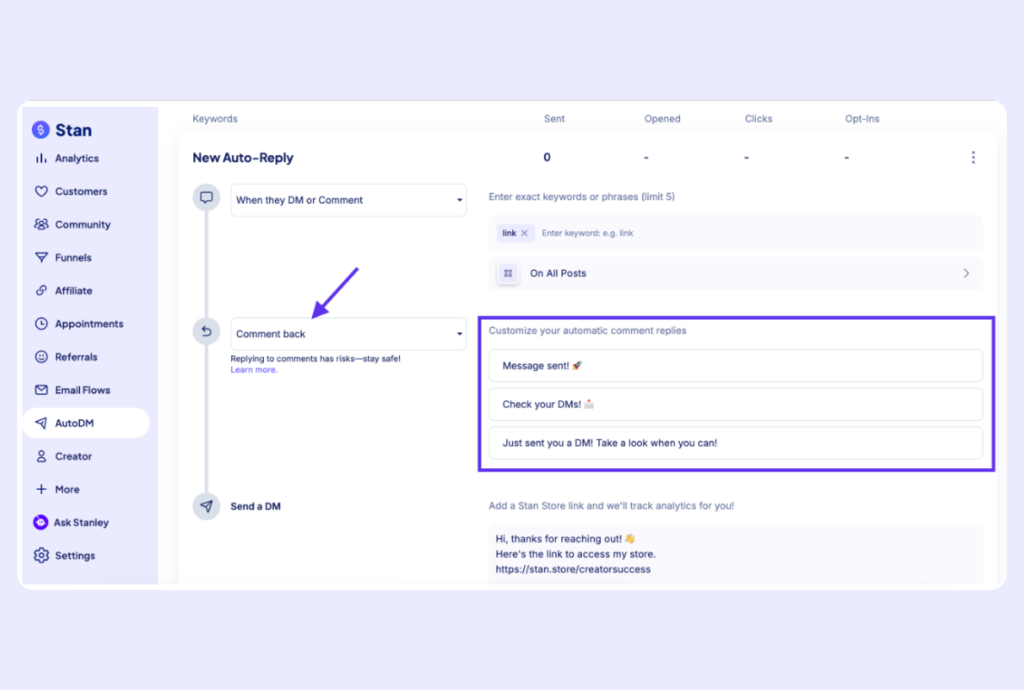
You’ll also want to configure your AutoDM’s on-comment setting, which defaults to no reply. I’d recommend switching it to Comment back.
A public reply on the comment does two things: It tells your follower the Instagram automation went through, and it nudges them to check their DMs for the link. Without it, plenty of people won’t even realize a message is waiting for them (especially if it’s sitting in their message requests folder).
🚨 Heads Up! Meta can flag repetitive, identical replies as bot behavior. You can lower that risk by writing a few different reply options instead of firing off the exact same line every time someone comments your keyword. Plus, a little variation keeps every response looking human.
Step 4: Write Your Message and Add Your Link
This is the most important part of the whole build. The message is the entire reason someone commented your keyword in the first place—they want what you promised, so don’t overthink it. Keep your message short, friendly, and clear.
Stan gives you a generic starter message, but I recommend swapping that out for something in your own voice. If you’re handing over a free guide, you might write something like: “Hey! Here’s the link to grab your free guide. I can’t wait to hear what you think of it! 👇”

Then, paste your link right below it. That link can point to the checkout page for a product in your Stan Store, or straight to a free resource like a public Canva file, Google Doc, or Notion link. If you’re delivering a lead magnet or digital download, this is where it goes.
⭐️ Pro Tip: Stan tracks the clicks on whatever link you drop in here, so you’ll be able to see exactly how your AutoDM is performing later within your Stan Store dashboard.
Step 5: Publish and Test It
When you’re happy with everything, you’ve got two choices:
- Press Save Draft to park it and come back later.
- Or click Publish to take it live right now.
Once you hit publish, you’ll see a “changes published” confirmation. Back in your AutoDM tab, your new reply will show as active—with columns for how many messages were Sent, Opened, Clicked, and Opted in.

Now for the fun part—experiencing the magic in action. Head to one of your posts and comment your AutoDM keyword. Within seconds, you’ll see the auto-reply pop up on your comment, and when you open your DMs, you’ll see your message with the link. Click it, and you’ll land on the same checkout or landing page your audience will.
That’s the entire experience from your follower’s side: they comment one word, your link shows up in their DMs instantly, and they get exactly what they came for. You get a lead, a happier follower, and a real shot at turning them into a paying customer down the line.
⭐️ Pro Tip: You’re not capped at one AutoDM. You can easily setup a separate reply for every offer you run—a unique keyword, message, and link for each freebie, launch, or product. One for your free guide, one for your waitlist, one for your new drop. You can point each post to your most relevant offer and maximize sales in while you sleep.
Turn Every Comment Into a Lead on Stan Store
There you have it—a fully automated workflow that turns your Instagram comment section into a steady stream of leads, working around the clock whether you’re online or asleep.
The best move is to start simple. Pick one keyword, one offer, and one clear message, then watch the DMs work their magic. Once you see it working, you can layer on more automations for every post that pops—and never be caught copy-and-pasting DM replies in the middle of the night again.
Want more simple tips to grow your Creator business faster? Stan’s Success tab has everything you need—with more lessons and tutorials from Professor T. Try it yourself with a free trial of Stan Store.
FAQ: Stan Store AutoDM
AutoDM works with Instagram. You can set up automating replies from comments, direct messages, and even Story replies—so if a follower responds to your Instagram Story with your keyword, they’ll get your AutoDM, too.
No. “Guide” and “GUIDE” are treated the same in the eyes of Stan AutoDM, so you don’t need to input different capitalizations. I recommend using your keyword slots to cover common misspellings and variations instead.
The most common culprit is another app managing your DMs. If you’re still connected to ManyChat or a similar tool, disconnect it so Stan can control your Instagram messages. Also double-check that your Instagram is connected, your automation is published, and each keyword was setup correctly by pressing Enter.
You can add up to five keywords or phrases per automation. That gives you room to catch misspellings and keyword variations so a typo never blocks a follower from getting your link.
Yes—and you should. You can create as many auto replies as you want, each with their own keyword, message, and link. That way every offer you promote sends followers to exactly the right place.
They’ll go inactive, but they won’t disappear. Stan saves your AutoDMs, so if you reconnect your Instagram later, everything’s right where you left it.
Right next to your keywords, you’ll see how many messages were Sent, how many were Opened, how many Clicks your link got, and how many Opt-Ins turned into purchases. Any external link you include gets tracked too—not just Stan Store links.